With the revolution in the concept of web page design and maintaining, to develop a closer relationship with one visiting your page is important. The viewer may be in need of using it other times, on the other hand you get active visitors for your web page. Here the concept of sign in form and registration form pups up. Firstly, after having a look over the importance, we will approach with better way to insert some Beautiful HTML CSS Sign Up and Registration Form over your web page.
While surfing over internet, you come across the ready to use sign up forms. These forms ask the details of user like name, address, email Id, Photo, gender, job including biography. The sign up forms includes username and password as basic elements. Some of these components may vary as per the form you select but basic idea is to verify the identity of your user and develop better link with them.
Among many HTML, CSS forms over internet we have listed down some best one in terms of their compatibility, flexibility and space occupied. These will be of great help for you.
This full page, responsive CodePen is the creation of Dany Santos. The login forms only contain email and password whereas sign in form contains email, username and password. In addition these components only appear once you choose whether to log in or sign up. With the background animation this one looks attractive.

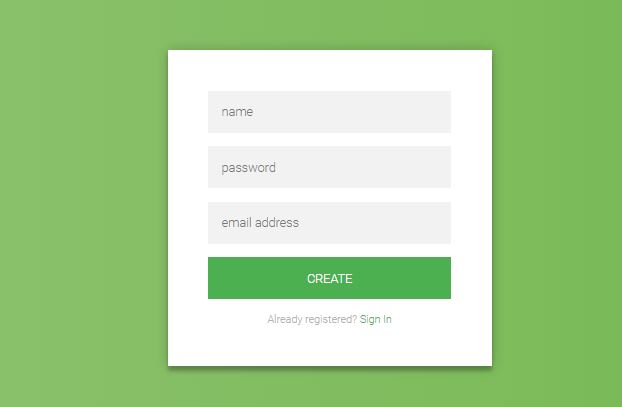
Similar to the first one this is also the CodePen by Eric whereas the component of forms is also similar. But, here the component appears in the same page so you don’t have to initially select to view the components. But admit the fact that with the plain background this one is less attractive but is flexible and light weighted.

This is simple looking registration form including plenty of examples. It is easily compatible with windows and androids as well. Moreover, designers himself have separated the forms in different categories like mini, labels in top, validity and so on. This is interactive and user friendly form example by tutorialzine.
Download and Demo

Jose Carnerioover made this simple and light weighted form by Jose over CodePen featuring to collect large number of information. It includes gender, date of birth and payment option including credit card number beside the basic one i.e. email and password. So this is best designed for online shopping and marketing.
Code and Demo

This compatible user friendly code for sign in and sign up form is the design of Josh Sorosky. It has a simple look and coded with HTML, CSS and JavaScript. Sign up Screen Animation only contain the basic things like username and password including email for sign up form.
Code and Demo

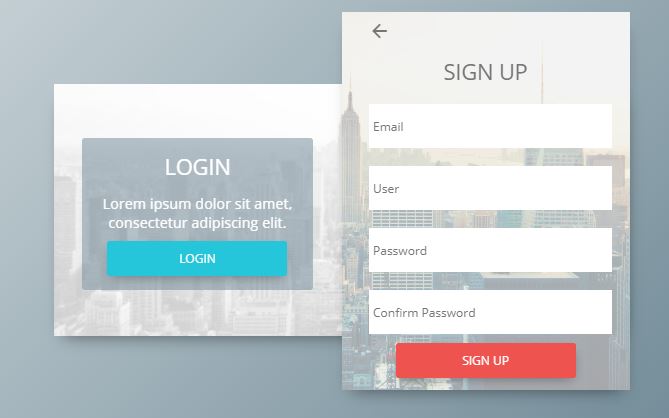
This attractive and beautiful log in and registration form is the creation of Grandvincvcent Marion. With the beautiful background picture and just basic component on forms this is actually popular with thousands of views. This is well flexible allowing easy modification and is a attractive one.
Material design log in sin up form is simple and extremely light weighted form by Brawada over CodePen. This composes of HTML, CSS and JavaScript codes and looks simple and beautiful. It just includes the basic component of forms and uses less space of your web page.
Download and Code

This is interactive, beautiful code by Kyle Lavery. Its simplicity makes it popular with, many thousand of view. Furthermore material Design Signup Interaction contains just basic component of forms but you can easily add up newer one as this is highly flexible. This is simple registration form over CodePen.
Code and Demo

Martin Machycek is popular developer in CodePen. He designed this very simple and good looking sign up and login form through HTML, CSS and JavaScript. In addition it is compatible and light weighted which is the best aspect of this form. It just included email and Password so better useful for simple WebPages then commercial one.
View Code and Demo
Sign in and Sign up – Single Form

This is interactive light weighted sign in and sign up forms by Dany Santos over CodePen. It is simple with just email and password so not well designed for commercial purpose. Because of its less weight and simple nature it has collected few thousand of view making it the attractive one.

This is interactive sign up form by Matthew Largent. Not only email and password but it also includes other personal information like age interest and biography. So this is useful for commercial sites and job searching sites. Moreover it has only HTML and CSS code, however is the useful one.
Code and Demo

This is the attractive sign up form by Kov Jonas. Moreover it provides with easy linkage with social media used by viewers. Furthermore this facility makes a frequent link u with viewers and furthermore even helps in advertisement of pages over social media. With the beautiful background image in addition to flexibility, it is well preferred.
View Code and Demo
This is extremely simple and light login form coded with HTML5 and CSS3. This is design of Aigars Silkans. It only included username and password so best designed for informative personal blogs and small websites. Fact that this has maximum number of views unlike some other CodePen is convincing.
Live Demo and Code

This beautiful sign up form is the creation of Momciloo Popov. Along with the simple components of a form it furthermore has an image side by that moves with the touch. It included all HTML, CSS and JavaScript codes.

Last but not the least, Sign up Daily UI is best login form for mobile phone by Gabrielle wee over CodePen. Moreover, it looks attractive with the background image and animation can easily replace that image. It just includes name, email and password.
Conclusion
Initially we know, among many aspects of your web page, registration and sign up follows the first order. This creates the profile of each user and moreover leads to better user management systems. In the first pace, HTML is the building block of everything and CSS makes things look attractive. So, HTML and CSS sums up making a beautiful HTML CSS Sign Up and Registration Form for your web page.
Для обмена данными между компьютером пользователя и сервером в HTML применяются формы . Обычно обмен данными происходит следующим образом: пользователь вводит требуемые данные в поля формы, после чего они отправляются на сервер, где обрабатываются соответствующей программой. Если это, например, регистрационные данные пользователя, то они проверяются на соответствие предъявляемым требованиям и, в случае успешной проверки, заносятся в базу данных. Пользователю при этом возвращается ответ, в котором либо сообщается об успешном завершении регистрации, либо предлагается возможность исправить ошибки, допущенные в ходе заполнения полей формы. Конечно, применение форм не ограничивается только лишь сбором данных от пользователей и передачей их на сервер для обработки, однако данное предназначение следует считать основным.
Тег
Пример 6.1. Использование элемента "form"
Здравствуй, дорогой хабрадруг! В этом туториале мы научимся создавать две формы HTML5: форма входа и форма регистрации. Эти формы будут меняться друг с другом местами с помощью псевдо-класса CSS3 :target . Мы будем использовать CSS3 и шрифт с иконками. Идея этого демо в том, чтобы показать пользователю форму входа и предоставить ему ссылку “перехода” к форме регистрации.
В этом туториале я подробно расскажу о том, как создавать эффект как в Демо 1 .
HTML
Здесь мы использовали несколько приемов HTML5. Например, элемент type=password автоматически скрывает то, что пользователь печатает и заменяет символы точками или звездочками (зависит от браузера). Элемент type=email позволяет браузеру проверить правильность формата email адреса. Кроме того, мы использовали параметр require=required ; браузеры, поддерживающие данный параметр не позволят пользователю отправить форму до тех пор, пока поле не заполнено, JavaScript здесь не требуется. Параметр autocomplete=on будет автоматически заполнять некоторые поля. Мы также использовали замещающийся текст, который поможет пользователю при заполнении формы.
Теперь о двух хитрых моментах. Вы наверное заметили две ссылки в начале формы. Этот ловкий прием позволит нашей формы вести себя правильно при работе с якорями (anchors).
Второй момент связан с применением шрифта с иконками. Мы будем использовать data-attribute , чтобы отобразить иконки. Устанавливая параметр data-icon=”icon_character” с соответствующим символов в HTML, мы должны назначить лишь одно правило в CSS для установления стиля всех иконок. Подробнее об этом приеме можно почитать на сайте: 24 Ways: Displaying Icons with Fonts and Data- Attributes .
CSS
Для чистоты кода я пропущу базовые параметры (html, body и т.п.), но вы сможете найти их в исходных файлах. Повторяю, что я использую приемы CSS3, которые не будут работать во всех браузерах. Итак, давайте же приступим!Стилизуем формы, используя CSS3
Во-первых, давайте назначим нашим формам базовый стиль.#subscribe, #login{ position: absolute; top: 0px; width: 88%; padding: 18px 6% 60px 6%; margin: 0 0 35px 0; background: rgb(247, 247, 247); border: 1px solid rgba(147, 184, 189,0.8); box-shadow: 0pt 2px 5px rgba(105, 108, 109, 0.7), 0px 0px 8px 5px rgba(208, 223, 226, 0.4) inset; border-radius: 5px; } #login{ z-index: 22; }
Здесь мы назначим свойства для шапки:
/**** текст ****/ #wrapper h1{ font-size: 48px; color: rgb(6, 106, 117); padding: 2px 0 10px 0; font-family: "FranchiseRegular","Arial Narrow",Arial,sans-serif; font-weight: bold; text-align: center; padding-bottom: 30px; } /** На донный момент только webkit поддерживает background-clip:text; **/ #wrapper h1{ background: -webkit-repeating-linear-gradient(-45deg, rgb(18, 83, 93) , rgb(18, 83, 93) 20px, rgb(64, 111, 118) 20px, rgb(64, 111, 118) 40px, rgb(18, 83, 93) 40px); -webkit-text-fill-color: transparent; -webkit-background-clip: text; } #wrapper h1:after{ content:" "; display:block; width:100%; height:2px; margin-top:10px; background: linear-gradient(left, rgba(147,184,189,0) 0%, rgba(147,184,189,0.8) 20%, rgba(147,184,189,1) 53%, rgba(147,184,189,0.8) 79%, rgba(147,184,189,0) 100%); }
Замечу, что сегодня только браузеры с webkit поддерживают background-clip: text , поэтому мы сделаем полосатый фон только для webkit и привяжем его к заголовку H1. Так как параметр background-clip: text работает только в Webkit браузерах, я решил работать только со свойствами webkit. Именно поэтому я разделил CSS на две части и использовал только градиент webkit. Однако вы не должны использовать лишь webkit на своих вебсайтах! Так, например, параметр -webkit-text-fill-color: transparent позволяет нам иметь прозрачный фон, но только для браузеров webkit, все другие браузеры проигнорируют это свойство.
Мы также создали тонкую линию под заголовком с помощью элемента:after pseudo-class. Мы использовали градиент с 2px в высоту и уменьшили прозрачность по краям до нуля.
Теперь давайте позаботимся о полях ввода и придадим им приятный вид.
/**** advanced input styling ****/ /* placeholder */ ::-webkit-input-placeholder { color: rgb(190, 188, 188); font-style: italic; } input:-moz-placeholder, textarea:-moz-placeholder{ color: rgb(190, 188, 188); font-style: italic; } input { outline: none; }
Во-первых, мы стилизуем поля и уберем обводку. Но будьте осторожны: обводка помогает пользователю понять, на каком поле он находится. Если же вы уберете ее, то нужно применить свойства:active и:focus.
/* все поля исключают submit и checkbox */ #wrapper input:not(){ width: 92%; margin-top: 4px; padding: 10px 5px 10px 32px; border: 1px solid rgb(178, 178, 178); box-sizing: content-box; border-radius: 3px; box-shadow: 0px 1px 4px 0px rgba(168, 168, 168, 0.6) inset; transition: all 0.2s linear; } #wrapper input:not():active, #wrapper input:not():focus{ border: 1px solid rgba(91, 90, 90, 0.7); background: rgba(238, 236, 240, 0.2); box-shadow: 0px 1px 4px 0px rgba(168, 168, 168, 0.9) inset; }
Здесь мы использовали псевдо класс:not, чтобы стилизовать все поля, кроме чекбоксов. Кроме того, я решил убрать обводку и добавил свойства:focus и:active.
Теперь время веселиться: шрифт с иконками. Так как мы не можем использовать псевдо-классы:before и:after, мы добавим иконку в параметр label, а затем разместим в поле. Я буду использовать библиотеку fontomas . Вы можете сами сопоставить иконки с соответствующей буквой. Помните атрибут data-icon ? Именно в него нужно вставить букву. Я использовал data-icon=’u’ для логина, ‘e’ для email, ‘p’ для пароля. Как только я выбрал буквы, я скачал шрифт и использовал генератор шрифтов fontsquirrel для конвертации в формат, пригодный для @font-face.
@font-face { font-family: "FontomasCustomRegular"; src: url("fonts/fontomas-webfont.eot"); src: url("fonts/fontomas-webfont.eot?#iefix") format("embedded-opentype"), url("fonts/fontomas-webfont.woff") format("woff"), url("fonts/fontomas-webfont.ttf") format("truetype"), url("fonts/fontomas-webfont.svg#FontomasCustomRegular") format("svg"); font-weight: normal; font-style: normal; } /** магический трюк! **/ :after { content: attr(data-icon); font-family: "FontomasCustomRegular"; color: rgb(106, 159, 171); position: absolute; left: 10px; top: 35px; width: 30px; }
Вот собственно и все. Вам не требуется иметь отдельный класс для каждой иконки. Мы использовали параметр content: attr(data-icon) , чтобы получить букву из атрибута data-icon. Таким образом, нам нужно лишь назначить шрифт, выбрать цвет и разместить иконку.
Теперь назначим правила для кнопки отправки формы.
/*стилизуем обе кнопки*/ #wrapper p.button input{ width: 30%; cursor: pointer; background: rgb(61, 157, 179); padding: 8px 5px; font-family: "BebasNeueRegular","Arial Narrow",Arial,sans-serif; color: #fff; font-size: 24px; border: 1px solid rgb(28, 108, 122); margin-bottom: 10px; text-shadow: 0 1px 1px rgba(0, 0, 0, 0.5); border-radius: 3px; box-shadow: 0px 1px 6px 4px rgba(0, 0, 0, 0.07) inset, 0px 0px 0px 3px rgb(254, 254, 254), 0px 5px 3px 3px rgb(210, 210, 210); transition: all 0.2s linear; } #wrapper p.button input:hover{ background: rgb(74, 179, 198); } #wrapper p.button input:active, #wrapper p.button input:focus{ background: rgb(40, 137, 154); position: relative; top: 1px; border: 1px solid rgb(12, 76, 87); box-shadow: 0px 1px 6px 4px rgba(0, 0, 0, 0.2) inset; } p.login.button, p.signin.button{ text-align: right; margin: 5px 0; }
Трюк заключается в том, чтобы использовать box-shadow, чтобы создать несколько рамок. Естественно, вы можете использовать лишь одну рамку, но также можно и несколько. Мы будем использовать параметр length для создания “фейковой” второй белой рамки, 3px в ширину, без размытия.
Теперь стилизуем чекбокс, здесь мы ничего необычного не сотворим:
/* стилизуем чекбокс "запомнить меня"*/ .keeplogin{ margin-top: -5px; } .keeplogin input, .keeplogin label{ display: inline-block; font-size: 12px; font-style: italic; } .keeplogin input#loginkeeping{ margin-right: 5px; } .keeplogin label{ width: 80%; }
Стилизуем подвал формы, используя множественные линейные градиенты, чтобы создать полосатый градиент.
P.change_link{ position: absolute; color: rgb(127, 124, 124); left: 0px; height: 20px; width: 440px; padding: 17px 30px 20px 30px; font-size: 16px ; text-align: right; border-top: 1px solid rgb(219, 229, 232); border-radius: 0 0 5px 5px; background: rgb(225, 234, 235); background: repeating-linear-gradient(-45deg, rgb(247, 247, 247) , rgb(247, 247, 247) 15px, rgb(225, 234, 235) 15px, rgb(225, 234, 235) 30px, rgb(247, 247, 247) 30px); } #wrapper p.change_link a { display: inline-block; font-weight: bold; background: rgb(247, 248, 241); padding: 2px 6px; color: rgb(29, 162, 193); margin-left: 10px; text-decoration: none; border-radius: 4px; border: 1px solid rgb(203, 213, 214); transition: all 0.4s linear; } #wrapper p.change_link a:hover { color: rgb(57, 191, 215); background: rgb(247, 247, 247); border: 1px solid rgb(74, 179, 198); } #wrapper p.change_link a:active{ position: relative; top: 1px; }
Сейчас вы видите, что у нас две приятные формы, но ведь мы хотим, чтобы отображалась только лишь одна из них. Пришло время анимации!
Создаем анимацию
Первое, что мы сделаем, мы спрячем вторую форму, назначив opacity на 0:#register{ z-index: 21; opacity: 0; }
Помните, что форма входа имеет параметр z-index: 22? Второй форме мы назначим этот параметр на 21, чтобы поставить его “под” форму входа.
Теперь самое интересное: меняем формы местами, используя псевдо класс:target. Вам нужно понять одну вещь по поводу:target: для перемещения мы будем использовать якоря. Нормальное поведение якоря - прыжок на определенный элемент страницы. Но мы не хотим этого, мы лишь хотим поменять формы местами. И тут приходит на помощь наш трюк с использованием двух ссылок в начале страницы. Вместо того, чтобы направить нас прямо на вторую форму, рискуя испытать эффект “прыжка”, мы придадим ссылкам параметр display: none . Это поможет избежать прыжков. Я обнаружил этот трюк на сайте: CSS3 create (французский язык).
#toregister:target ~ #wrapper #register, #tologin:target ~ #wrapper #login{ z-index: 22; animation-name: fadeInLeft; animation-delay: .1s; }
Вот, что происходит: когда мы кликаем на кнопку Присоединиться
, мы направляемся на #toregister. Затем происходит анимация и лишь потом переходим на элемент #register. Мы используем анимацию под названием fadeInLeft
. Так как мы “прячем” форму, используя нулевую прозрачность, мы применим анимацию, которая будем постепенно появляться. Мы также изменили z-index, чтобы она появилась поверх другой формы. То же самое происходит для другой формы same happens for the other form.
Вот код для анимации. Мы использовали CSS3 animation framework от Dan Eden и адаптировали этот фреймворк под наш туториал.
Animate{ animation-duration: 0.5s; animation-timing-function: ease; animation-fill-mode: both; } @keyframes fadeInLeft { 0% { opacity: 0; transform: translateX(-20px); } 100% { opacity: 1; transform: translateX(0); } }
Форма, которая “исчезает”, будет иметь анимацию затемнения влево:
#toregister:target ~ #wrapper #login, #tologin:target ~ #wrapper #register{ animation-name: fadeOutLeftBig; } @keyframes fadeOutLeft { 0% { opacity: 1; transform: translateX(0); } 100% { opacity: 0; transform: translateX(-20px); } }
Теперь вы можете использовать другие анимации от Dan Eden’ с помощью файла animate.css: просто измените класс.animate class и названия анимаций. Вы также обнаружите несколько других анимаций в конце файла animate-custom.css file.
Вот и все, друзья. Надеюсь вам понравился этот туториал!
Заметим, что в некоторых браузерах параметр background-clip: text не поддерживается. В Internet Explorer 9 анимации не работают. В Internet Explorer 8 и ниже псевдо-класс:target pseudo-class не поддерживается, поэтому там этот эффект вообще работать не будет.
P.S. Все замечания по поводу перевода с удовольствием приму в личку. Спасибо!
Теги: Добавить метки
In this tutorial, we are going to tell you how you can create Registration Form using HTML and CSS3. We will create two Registration forms; the first one is simple, and another one has Icons with each input field. The icons we have used are font icons. These registration forms are simple, clean and attractive.
The icons we have used are font icons. These registration forms are simple , clean code and unique in design. You can be utilized it into your website and customize it as you need.
If you are looking for more forms collection, then this 40+ beautiful sign-up forms is the best collection I found on the internet. They posted a lot of forms free and premium as well.
The signup forms used on websites to allow the site visitors to create an account and build their profile. It depends on upon you what benefit you will give to the users who register on your website.
Some site used such form to provide more access to the user such as download files or post article etc. Anyway, Let’s have a look, how we can create them.
Registration Form in HTML
Let’s start with registration form HTML code. Both forms code added inside the div class name cclogin .
For simple form, we have added class simple next to cclogin and for icon style form , we have added class icons next to cclogin .
The input fields of the form are inside the p tag. let’s have a look block of HTML code.
Let’s add some placeholders
But if you see the demo, I have to make the first name and last name fields small and fit them into one row. To make them like that we have added half class into p the tag.
As I said you before that, another Form is icon style form. In this form, we have used a similar technique which we have previously used in As you know we are using font icon so we have added it to span tag.
Forms Styling with CSS
First of all, we will take a look at style-sheet of icons. For icons, we have used:before attribute
Fa-user:before { content: "\f007"; } .fa-key:before { content: "\f084"; } .fa-envelope:before { content: "\f0e0"; }
Let’s see styling of the fields
Cclogin input, .cclogin input, .cclogin select{ padding:10px; width:100%; border:none; height:50px; line-height:50px; color:#757575; }
The form fields without icons have 100% width, but for the fields without have 92% width, this is because we require space to add icons before the input fields.
To make the fields small, we just have added class .half into p the tag and set it’s width to 48%. For second field we have added .last class next to .half class so we can make the margin-right:0%; in the CSS.
Cclogin .half { float: left; width: 48%; margin-right:4% } .cclogin .half.last{ margin-right:0%; }
The icons used in the demo are from the Font Awesome set by Davegandy and they are licensed under the CC BY 3.0 license. Hope you enjoy this CSS3 user register Form. Leave the comment to let us know.
Creating a membership based site seems like a daunting task at first. If you ever wanted to do this by yourself, then just gave up when you started to think how you are going to put it together using your PHP skills, then this article is for you. We are going to walk you through every aspect of creating a membership based site, with a secure members area protected by password.
The whole process consists of two big parts: user registration and user authentication. In the first part, we are going to cover creation of the registration form and storing the data in a MySQL database. In the second part, we will create the login form and use it to allow users access in the secure area.
Download the code
You can download the whole source code for the registration/login system from the link below:
Configuration & Upload
The ReadMe file contains detailed instructions.
Open the source\include\membersite_config.php file in a text editor and update the configuration. (Database login, your website’s name, your email address etc).
Upload the whole directory contents. Test the register.php by submitting the form.
The registration form
In order to create a user account, we need to gather a minimal amount of information from the user. We need his name, his email address and his desired username and password. Of course, we can ask for more information at this point, but a long form is always a turn-off. So let’s limit ourselves to just those fields.
Here is the registration form:
So, we have text fields for name, email and the password. Note that we are using the for better usability.
Form validation
At this point it is a good idea to put some form validation code in place, so we make sure that we have all the data required to create the user account. We need to check if name and email, and password are filled in and that the email is in the proper format.
Handling the form submission
Now we have to handle the form data that is submitted.
Here is the sequence (see the file fg_membersite.php in the downloaded source):
function RegisterUser() { if(!isset($_POST["submitted"])) { return false; } $formvars = array(); if(!$this->ValidateRegistrationSubmission()) { return false; } $this->CollectRegistrationSubmission($formvars); if(!$this->SaveToDatabase($formvars)) { return false; } if(!$this->SendUserConfirmationEmail($formvars)) { return false; } $this->SendAdminIntimationEmail($formvars); return true; }
First, we validate the form submission. Then we collect and ‘sanitize’ the form submission data (always do this before sending email, saving to database etc). The form submission is then saved to the database table. We send an email to the user requesting confirmation. Then we intimate the admin that a user has registered.
Saving the data in the database
Now that we gathered all the data, we need to store it into the database.
Here is how we save the form submission to the database.
function SaveToDatabase(&$formvars) { if(!$this->DBLogin()) { $this->HandleError("Database login failed!"); return false; } if(!$this->Ensuretable()) { return false; } if(!$this->IsFieldUnique($formvars,"email")) { $this->HandleError("This email is already registered"); return false; } if(!$this->IsFieldUnique($formvars,"username")) { $this->HandleError("This UserName is already used. Please try another username"); return false; } if(!$this->InsertIntoDB($formvars)) { $this->HandleError("Inserting to Database failed!"); return false; } return true; }
Note that you have configured the Database login details in the membersite_config.php file. Most of the cases, you can use “localhost” for database host.
After logging in, we make sure that the table is existing.(If not, the script will create the required table).
Then we make sure that the username and email are unique. If it is not unique, we return error back to the user.
The database table structure
This is the table structure. The CreateTable() function in the fg_membersite.php file creates the table. Here is the code:
function CreateTable() { $qry = "Create Table $this->tablename (". "id_user INT NOT NULL AUTO_INCREMENT ,". "name VARCHAR(128) NOT NULL ,". "email VARCHAR(64) NOT NULL ,". "phone_number VARCHAR(16) NOT NULL ,". "username VARCHAR(16) NOT NULL ,". "password VARCHAR(32) NOT NULL ,". "confirmcode VARCHAR(32) ,". "PRIMARY KEY (id_user)". ")"; if(!mysql_query($qry,$this->connection)) { $this->HandleDBError("Error creating the table \nquery was\n $qry"); return false; } return true; }
The id_user field will contain the unique id of the user, and is also the primary key of the table. Notice that we allow 32 characters for the password field. We do this because, as an added security measure, we will store the password in the database encrypted using MD5. Please note that because MD5 is an one-way encryption method, we won’t be able to recover the password in case the user forgets it.
Inserting the registration to the table
Here is the code that we use to insert data into the database. We will have all our data available in the $formvars array.
function InsertIntoDB(&$formvars) { $confirmcode = $this->MakeConfirmationMd5($formvars["email"]); $insert_query = "insert into ".$this->tablename."(name, email, username, password, confirmcode) values ("" . $this->SanitizeForSQL($formvars["name"]) . "", "" . $this->SanitizeForSQL($formvars["email"]) . "", "" . $this->SanitizeForSQL($formvars["username"]) . "", "" . md5($formvars["password"]) . "", "" . $confirmcode . "")"; if(!mysql_query($insert_query ,$this->connection)) { $this->HandleDBError("Error inserting data to the table\nquery:$insert_query"); return false; } return true; }
Notice that we use PHP function md5() to encrypt the password before inserting it into the database.
Also, we make the unique confirmation code from the user’s email address.
Sending emails
Now that we have the registration in our database, we will send a confirmation email to the user. The user has to click a link in the confirmation email to complete the registration process.
function SendUserConfirmationEmail(&$formvars) { $mailer = new PHPMailer(); $mailer->CharSet = "utf-8"; $mailer->AddAddress($formvars["email"],$formvars["name"]); $mailer->Subject = "Your registration with ".$this->sitename; $mailer->From = $this->GetFromAddress(); $confirmcode = urlencode($this->MakeConfirmationMd5($formvars["email"])); $confirm_url = $this->GetAbsoluteURLFolder()."/confirmreg.php?code=".$confirmcode; $mailer->Body ="Hello ".$formvars["name"]."\r\n\r\n". "Thanks for your registration with ".$this->sitename."\r\n". "Please click the link below to confirm your registration.\r\n". "$confirm_url\r\n". "\r\n". "Regards,\r\n". "Webmaster\r\n". $this->sitename; if(!$mailer->Send()) { $this->HandleError("Failed sending registration confirmation email."); return false; } return true; }
Updates
9th Jan 2012
Reset Password/Change Password features are added
The code is now shared at GitHub .
Welcome back UserFullName(); ?>!
License

The code is shared under LGPL license. You can freely use it on commercial or non-commercial websites.
No related posts.
Comments on this entry are closed.
 Новогодние торты – оригинальные идеи оформления десертов в новогоднем стиле!
 Толкование сна шнурки в сонниках Снилось белый шнурок
 Котенковские чтения Награды и звания